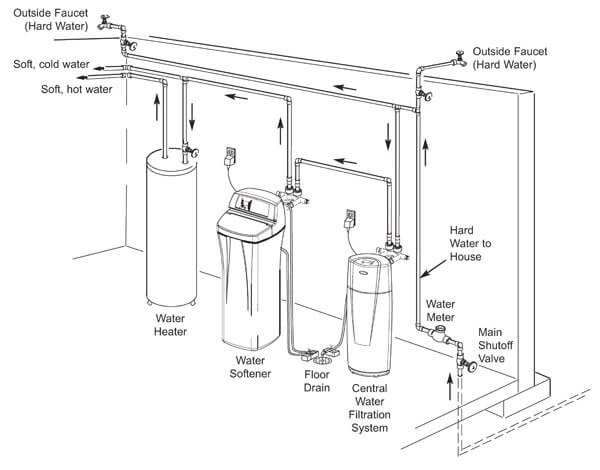
How Do You Install PVC Compression Tees?
PVC compression tees are a handy and affordable way to connect pipes made of polyvinyl chloride, or PVC. They are easy to install and require no special tools or skills, making them ideal for do-it-yourself plumbing projects. This guide outlines the steps for installing PVC compression tees, including what supplies you need and the proper way to tighten the fittings. With the right materials and a little bit of patience, anyone can install PVC compression tees with ease.
Preparing the Pipe for Installation
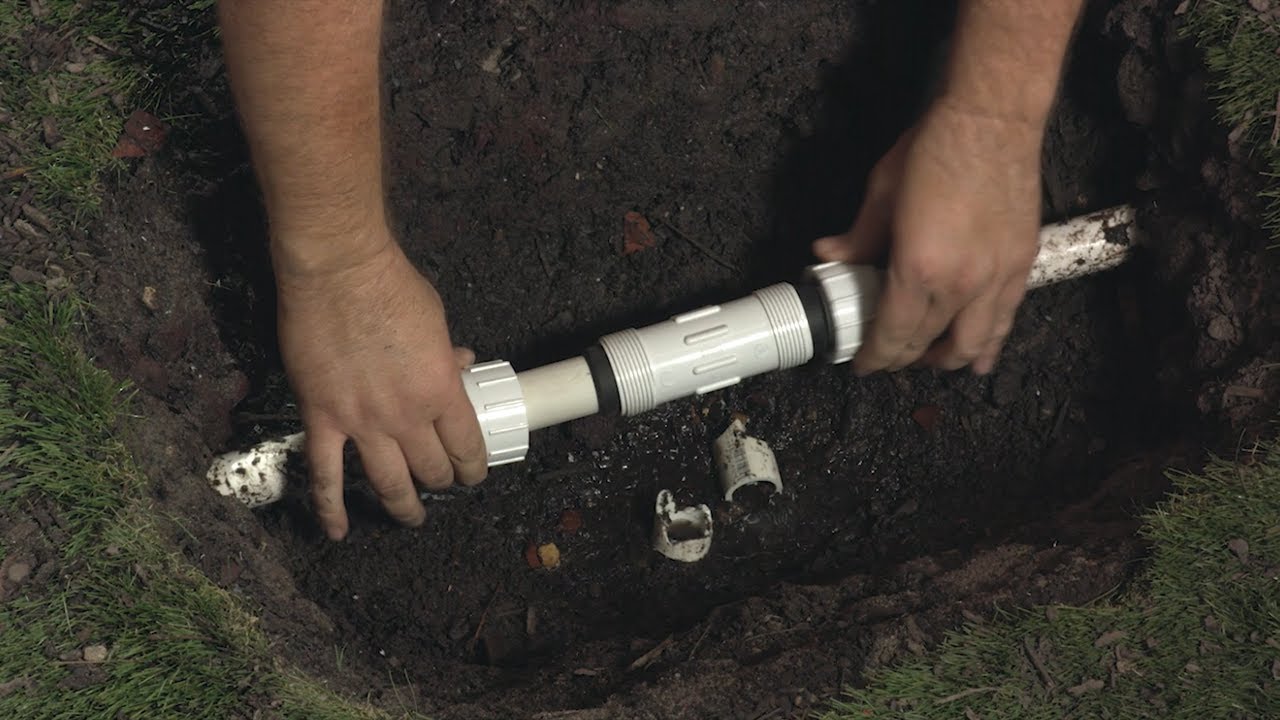
Achieving a successful installation of a PVC compression tee requires more than simply tightening the compression nut. When installing a PVC compression tee, proper preparation of the pipe is paramount. To ensure that the connection is secure and leak-free, it is important to use the right tools, make sure that the pipe is in good condition, and clean the pipe’s surface.
First, the pipe needs to be cut to the desired length using a fine-toothed saw. Before installation, the pipe should be checked for cracks, chips, and other damage to ensure that the connection is not compromised. After the pipe has been cut to size, the surface should be sanded to remove any burrs and create a smooth surface.
It is also important to use the correct tools for installation. A PVC socket wrench should be used to securely tighten the compression nut on the tee. This will ensure that the connection is secure and will not leak. Additionally, a pipe reamer should be used to remove any additional burrs or other debris from the inside of the pipe.
By taking the necessary steps to prepare the pipe for installation, you can ensure that the PVC compression tee will be securely installed and will not leak. With the right tools and careful preparation, installing a PVC compression tee can be a relatively quick and easy process.
Identifying the Appropriate Size of PVC Compression Tee
Installing a PVC compression tee can be a daunting task. It requires a thorough understanding of the various sizes and types of PVC fittings, as well as the specific type of tee you need for your project. One of the most important steps in a successful installation is identifying the appropriate size of the PVC compression tee.
To determine the size of the tee you need for your project, it’s important to measure the inside diameter of the PVC pipe that the tee will be connected to. The size of the PVC pipe will determine the size of the tee you need. For example, a 1/2 inch PVC pipe would require a 1/2 inch compression tee.
The other factor to consider when selecting the size of the tee is the type of material it is made from. PVC compression tees are available in brass, steel, and plastic varieties. Depending on the type of material, you may need a different size tee.
Once you have identified the correct size, you can begin the installation process. It’s important to use the right tools and techniques to ensure a successful installation. Properly installed, a PVC compression tee can provide a strong, reliable connection between two pipes.
Installing the PVC Compression Tee
is a straightforward task that requires basic tools and materials. Despite its simplicity, there are a few key steps to ensure a successful installation. To start, make sure that all the parts are in the correct orientation and the correct size. Next, apply a lubricant to the outside of the pipe and the inside of the compression tee. Finally, use a wrench to tighten the compression nuts. With this method, you can securely install the PVC Compression Tee in no time.
Installing a PVC Compression Tee is a great way to join two pipes and provide a secure seal. PVC tee fittings have a wide range of applications, from plumbing and irrigation to water supply and drainage systems. Despite its simplicity, there are a few key steps to follow to ensure a successful installation. First, make sure that all the parts are in the correct orientation and the correct size. For instance, some tee fittings are designed specifically for use with CTS (copper tube size) pipe, while others are designed for IPS (iron pipe size) pipe. Once you have the correct fittings, it’s time to apply a lubricant to the outside of the pipe and the inside of the compression tee. This will ensure that the parts fit snugly when tightened. Finally, use a wrench to tighten the compression nuts. With this method, you can securely install the PVC Compression Tee in no time.

Sealing the PVC Compression Tee
Installing a PVC compression tee can be a tricky process. However, when done correctly, the results are a durable and secure connection. To begin, the tee must be properly sized to match the pipe. Once the size is determined, the tee can be inserted into the end of the pipe, and the compression nut can be tightened using a wrench. Then, the compression ring can be inserted into the tee, followed by the compression nut. Finally, the tee must be sealed to prevent leaks. To do this, a sealant such as silicone or Teflon tape must be applied to the threads of the compression nut. Once the sealant is dry, the compression nut can be tightened further to ensure a secure seal. By following these steps, a PVC compression tee can be installed with confidence.
Testing the PVC Compression Tee
Installing a PVC compression tee requires attention to detail and precise measurements. But once the installation is complete, it’s important to make sure the tee is working properly. Testing the PVC compression tee helps to ensure the connection is secure and water-tight, preventing potential damage to the pipes and the surrounding area.
The first step in testing the tee is to install the necessary fittings. This includes a pressure gauge, a shut-off valve, and a short length of pipe connected to the tee. Once the fittings are installed, the system should be pressurized and the pressure should be monitored for a few minutes. If the pressure remains steady, the tee is likely to be secure.
Next, a water test should be performed to check for leaks. To do this, the shut-off valve should be opened and the pressure should be increased to a level slightly higher than the pressure that was monitored. This allows the system to be tested for leaks without causing any damage. Once the water test is complete, the pressure should be safely released and the shut-off valve should be closed.
Regular testing of the PVC compression tee helps to ensure that the connection is secure and water-tight. By following the steps outlined above, the tee can be tested safely and properly, protecting the pipes and the surrounding area from potential damage.
Troubleshooting Common Issues with PVC Compression Tees
PVC compression tees are a common plumbing component used for making connections between pipes of different sizes. They are easy to install, but there can be a few common issues with them. This blog post aims to provide an in-depth look at the most common problems encountered when installing a PVC compression tee.
The most frequent issue is improper alignment. When two pipes are connected through a compression tee, the connection must be lined up correctly. If the connection is off-center, it can cause a leak. To prevent this, all connections must be checked to make sure they are level and aligned.
Another issue is over-tightening. When installing a PVC compression tee, it is important to not overtighten the connections. Overtightening can cause the connection to crack or leak, leading to costly repairs. To ensure a secure connection, the nut should be tightened until it is finger-tight, and then an additional quarter turn should be made.
Finally, it is important to ensure that all connections are sealed properly. A sealant should be applied to the threads of the fitting before installation. This will ensure a watertight seal and prevent leaks.
In conclusion, proper installation of a PVC compression tee is key to a successful plumbing job. It is important to ensure that all connections are level, aligned, and properly sealed. If these steps are followed, the installation should be a success.
FAQs About the How Do You Install PVC Compression Tees?
1. What tools do I need to install a PVC compression tee?
A: You will need a hacksaw, a file, a reamer, a rubber mallet, PVC glue, PVC primer, and a measuring tape.
2. How do I connect the compression tee to the existing pipe?
A: First, measure the existing pipe and the compression tee to ensure a secure fit. Then, use a hacksaw to cut the pipe to the correct size. Make sure to file down any sharp edges. Apply PVC primer and glue to the ends of the pipe and tee before pushing the pieces together. Finally, use a rubber mallet to ensure that the tee is securely connected.
3. What is the difference between a regular PVC tee and a compression tee?
A: A regular PVC tee has a joint that needs to be glued and clamped together. A compression tee has an inner ring with an O-ring that provides a tight seal when the pieces are pushed together.
Conclusion
Installing PVC compression tees is a straightforward process that requires the use of a few basic tools. Once you have all the necessary parts and tools, the installation process is quite simple and can be completed in a short amount of time. With the proper tools and materials, you can successfully install PVC compression tees on your own and save time and money.