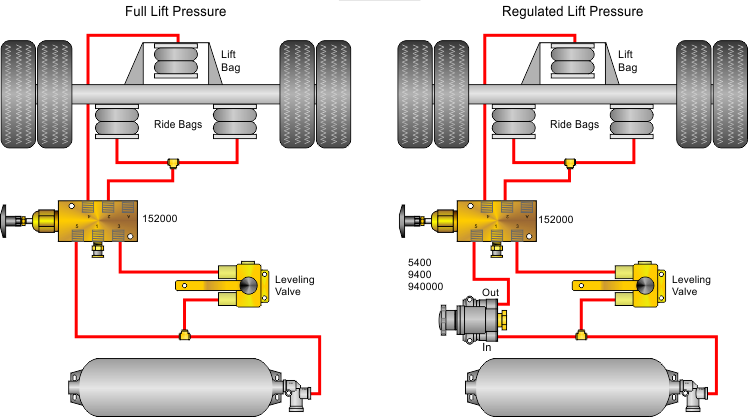
Lift Axle Plumbing Diagram
A lift axle plumbing diagram is a visual representation of the plumbing used to control the lift axle of a truck or trailer. It depicts the various components of the hydraulic system, such as the hydraulic cylinder, valves, hoses, and fittings, and the connections between them. Truck and trailer owners need to understand and be familiar with lift axle plumbing diagrams so that they can properly diagnose and repair any issues with their lift axle systems. Having a good understanding of the lift axle plumbing diagram can also help to prevent costly repairs due to incorrect installation or maintenance of the lift axle system.
Overview of Lift Axle Plumbing Diagrams
Lift axles are used in many commercial vehicles to provide extra stability and maneuverability. They are typically used on trucks and trailers for improved maneuverability and weight distribution. To ensure proper function, lift axles must be properly plumbed with the correct components and connections. Understanding the basics of lift axle plumbing diagrams can help commercial vehicle owners and technicians maintain their vehicles and ensure proper operation.
A lift axle plumbing diagram provides an overview of all the components and connections that make up the lift axle system. This includes the lift cylinder, air lines, valves, and other components. The diagram also shows how the components are connected and how they interact with each other. With a lift axle plumbing diagram, technicians can quickly identify problems and determine the best course of action to repair or replace faulty components.
Lift axle plumbing diagrams are also useful for troubleshooting problems with lift axles. By carefully examining the diagram and comparing it to the actual lift axle system, technicians can pinpoint areas of potential concern and make repairs as needed. By understanding the basics of lift axle plumbing diagrams, commercial vehicle owners and technicians can ensure their vehicles are properly maintained and functioning properly.
Types of Lift Axle Plumbing Diagram
Lift axles are a common component in the trucking industry, and understanding their plumbing diagrams is important for the efficient operation of any vehicle. While there are many types of lift axle plumbing diagrams out there, they all share the same basic components: a reservoir, a pump, and a valve. The reservoir is where the hydraulic fluid is stored, the pump is used to move the fluid, and the valve is used to control the direction of the flow.
When it comes to lifting axle plumbing diagrams, there are two basic types: single-line diagrams and multi-line diagrams. Single-line diagrams are relatively simple, and they are the most commonly used type of diagram. This type of diagram only shows the basic components of the system, such as the reservoir, pump, and valve. Multi-line diagrams, on the other hand, are much more complex and show additional components such as hydraulic cylinders, hoses, and fittings.
No matter which type of diagram is used, they all serve the same purpose: to provide an accurate and detailed representation of the lift axle plumbing system. These diagrams can be used to troubleshoot any issues with the system, as well as to ensure that the system is properly installed and functioning properly. By understanding the different types of lift axle plumbing diagrams, you can ensure that your vehicles are running as efficiently as possible.
Benefits of Lift Axle Plumbing Diagram
A lift axle plumbing diagram is a visual representation of how a lift axle works and the components that make it up. It is a helpful tool for mechanics, truck drivers, and those involved in the trucking industry. It provides a comprehensive overview of the system, including the parts and connections that make it function. It also allows for easy identification of components, making troubleshooting and maintenance easier.
A lift axle plumbing diagram also helps to maximize safety and efficiency when loading and unloading cargo. It is important to know the specific locations and connections of the components to ensure that the lift axle is functioning properly. Knowing the design and layout of the system can also help with troubleshooting and maintenance in the event of a problem.
The use of a lift axle plumbing diagram can help to optimize the performance of the system. It can help to identify potential issues before they become catastrophic, saving time and money. It also helps to ensure that the system is operating at peak efficiency, reducing wear and tear on components. By utilizing this diagram, proper installation and maintenance can be achieved, ultimately extending the life of the lift axle.
Overall, a lift axle plumbing diagram is a beneficial tool for those working in the trucking industry. It provides a comprehensive overview of the system, allowing for easy identification and troubleshooting of components. It also helps to maximize safety and efficiency when loading and unloading cargo and can help optimize the performance of the system. Utilizing this diagram can help to extend the life of the lift axle, saving time and money in the long run.

Materials Used for Lift Axle Plumbing
Lift axles are critical components in the construction of heavy-duty vehicles. They are used to support the weight of a vehicle when it is in motion, and their correct installation is essential for both safety and efficiency. The plumbing associated with lift axles is equally important, and it is essential to ensure that the right materials are used. In this article, we will explore the different materials used for lift axle plumbing and the benefits they provide.
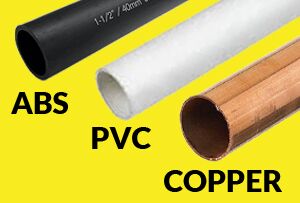
One of the most commonly used materials for lift axle plumbing is copper. This material is strong, durable, and can be easily shaped to fit the contours of a vehicle. Copper also has excellent corrosion resistance, making it a great choice for long-term use. Another popular material is stainless steel, which offers similar benefits and is also resistant to rust. Both of these materials are ideal for lift axle plumbing as they are lightweight, cost-effective, and easy to install.
Synthetic materials such as nylon and polyethylene are also used for lift axle plumbing. These materials are lightweight and flexible, allowing them to be easily routed through tight spaces. Nylon and polyethylene are also resistant to corrosion, making them an ideal choice for harsh weather conditions.
Finally, rubber is often used for lift axle plumbing. This material is soft and flexible, and it also offers excellent resistance to abrasion and corrosion. Rubber is also highly resistant to temperature fluctuations, making it an ideal choice for applications in extreme climates.
In conclusion, the materials used for lift axle plumbing are critical for the correct functioning of a vehicle. Copper, stainless steel, nylon, polyethylene, and rubber are all popular choices, and each offers its own unique set of benefits. By considering the needs of the application, it is possible to determine the best material for the job.
Installation and Maintenance of Lift Axle Plumbing
Installing and maintaining a lift axle plumbing system can be a daunting task, but with the right steps, it can be a simple process. Lift axle plumbing systems are used to provide extra support to the axles of heavy vehicles, such as semi-trucks, trailers, and large buses. This system keeps the axles properly balanced and ensures they can support the weight of the vehicle. To ensure your lift axle plumbing system is properly installed and maintained, here are some tips and tricks to follow:
First, make sure your lift axle plumbing diagram is complete and accurate. This diagram should include the location of the lift axles, the type of plumbing system being used, the number of axles, and the amount of air pressure required. You should also ensure that all the necessary parts are installed and in good working order.
Next, check the air pressure regularly. This is done by connecting an air gauge to the airlines and checking the air pressure. If the pressure is too low, the lift axle will not be able to support the vehicle’s weight. Regularly checking the air pressure will help you avoid any potential problems.
Finally, make sure all the plumbing connections are secure and tight. If the connections are not secure, the lift axle may not be able to support the vehicle’s weight. It’s also important to inspect the airlines and make sure there are no leaks or blockages.
By following these steps, you can ensure your lift axle plumbing system is installed and maintained properly. With a properly maintained system, your vehicle will be able to handle the heavy loads it’s designed for, providing you with peace of mind and improved performance.
Troubleshooting Issues with Lift Axle Plumbing
Lift axles are a useful addition to any vehicle, providing extra weight capacity and stability while supporting the entire weight of a trailer. They are especially useful when transporting heavy loads, such as livestock and construction materials. Despite their advantages, lift axles can sometimes experience plumbing issues. Understanding how the lift axle plumbing system works, and how to troubleshoot any potential problems, is essential for any driver.
The lift axle plumbing diagram is the first step to understanding the system. It looks like a standard plumbing system, with valves, hoses, and other components connected to the axle. The diagram will also include a description of what each component does and how it works. Knowing what each component does is key to identifying any potential problems.
Once the diagram is understood, the next step is to inspect the axle and its components. This includes checking for leaks, kinks in the hoses, and any other signs of damage. If any of these are identified, they can be repaired or replaced. However, it is important to remember that any repairs or replacements should be done by a professional.
Finally, the lift axle plumbing diagram should be regularly inspected and maintained. This includes checking for any blockages, debris, or corrosion, and making sure the hoses are properly connected and sealed. Regular maintenance can help prevent any further issues and ensure the axle works as intended.
By understanding lift axle plumbing diagrams and how to troubleshoot any potential issues, drivers can keep their axles in top condition and avoid any costly repairs. With proper maintenance and regular inspections, any driver can enjoy the benefits of a lift axle without any plumbing issues.
FAQs About the Lift Axle Plumbing Diagram
1. What is a lift axle plumbing diagram?
A lift axle plumbing diagram is a visual representation of how to install, maintain, and troubleshoot a lift axle. It shows the components of the system and how they interact with each other.
2. How do I know which parts to use for my lift axle?
Your lift axle manufacturer should provide you with a list of parts and instructions for installation. It is important to follow the instructions provided to ensure that the system is installed correctly and safely.
3. Is there a way to troubleshoot my lift axle if something goes wrong?
Yes. If you experience problems with your lift axle, consult your lift axle manufacturer’s manual or speak with a lift axle mechanic to troubleshoot the issue.
Conclusion
The Lift Axle Plumbing Diagram is a helpful tool for understanding the complex plumbing systems involved in operating a lift axle. It clearly shows the various components of the system, including the valves, tanks, and pumps, and how they are connected. With this diagram, it is easier to troubleshoot any problems that may arise and to make any necessary repairs or adjustments. This is a great resource for anyone looking to understand more about how lift axles work.