Bathroom Plumbing Rough In Slab Diagrams
Bathroom Plumbing Rough-In Slab Diagrams are diagrams that show the basic layout of plumbing pipes, fixtures, and other components for a bathroom. These diagrams are used to plan out the rough-in installation of the plumbing before any other components are installed. They can be used to identify the location of the main drain and other fixtures, and to map out the route pipes will take between them. By understanding the plumbing rough-in diagram, a plumber can accurately install the necessary components and make sure everything is in its proper place.
What is a Bathroom Plumbing Rough In Slab Diagram?
A plumbing rough-in slab diagram is a drawing that helps plumbers and contractors determine the layout of the pipes and fixtures during the rough-in stage of a bathroom remodel project. This diagram is essential for a successful installation and is the basis for all of the bathroom plumbing work. The contractor needs to understand the rough-in slab diagram so that they can ensure that the pipes are correctly installed and that the system is properly balanced.
The diagram typically includes the location of the sink, toilet, shower, and tub, as well as the position of any valves and the main water supply and drain lines. It also includes the required measurements for the pipes and fixtures, the type of pipe needed, and any additional fixtures such as a bidet or air bath. This information is then used to create a plan for the rough-in stage of the project.
Rough-in slab diagrams are critical for any bathroom remodeling project. Without an accurate diagram, plumbers may not be able to properly install the pipes and fixtures and the bathroom could end up with plumbing problems down the road. Therefore, it is important to make sure that your contractor understands the diagram and that they follow it during the rough-in stage of the project.
Why is a Bathroom Plumbing Rough In Slab Diagram Necessary?
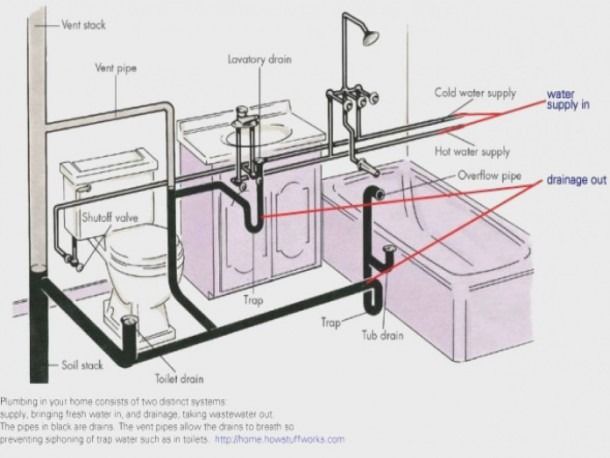
When constructing a bathroom, one of the most important steps is to ensure that the plumbing is done correctly and safely. A great way to do this is by using a bathroom plumbing rough-in slab diagram. This type of diagram provides a visual representation of the plumbing system and shows how each component is connected. It can also help with troubleshooting issues and identifying potential problems before they become costly repairs.
A bathroom plumbing rough-in slab diagram helps the contractor or homeowner ensure that all the necessary elements are present and functioning correctly. This includes the vent stack, the sink, the toilet, the shower, and the waste lines. It can also help identify potential problems, such as clogs or leaks before they become major issues. Additionally, it can save homeowners money by providing them with a way to do the plumbing themselves instead of hiring a professional.
Overall, a bathroom plumbing rough-in slab diagram is a valuable tool for anyone who is constructing or remodeling a bathroom. It can save time and money, as well as provide peace of mind that the plumbing is done properly. With the right diagram, it can be easy to identify and resolve any potential issues before they become costly repairs.
How to Measure for a Bathroom Plumbing Rough In Slab Diagram
Accurately measuring the plumbing rough-in of a bathroom is essential to ensure a successful renovation or new bathroom installation. Knowing exactly where to place the pipes, drains, and other plumbing components is key when planning a bathroom renovation or installation project. To properly measure a bathroom plumbing rough-in slab diagram, there are a few key steps to follow.
First, it is important to measure the locations of the bathtub, sink, and toilet carefully. Measure both the centerline and the location of the drain, as well as any other fixtures that will be installed. Additionally, take note of the distance between the fixtures, such as from the bathtub to the sink, and from the sink to the toilet.
Second, all the measurements taken can be used to create a bathroom plumbing rough-in slab diagram. This diagram should include the exact locations of the bathtub, sink, and toilet, as well as any other plumbing fixtures that will be installed. Be sure to include the exact distances between each fixture as well.
Finally, before proceeding with the bathroom renovation or installation, double-check the measurements and the rough-in slab diagram to ensure accuracy. Once this is done, the bathroom plumbing rough-in can be completed accordingly. Following these steps will ensure a successful bathroom renovation or installation project.

Installation Instructions for a Bathroom Plumbing Rough-In Slab Diagram
Bathroom plumbing can be a complex task, but with the right tools and information, it can be completed with ease. Understanding how to read and interpret plumbing diagrams is a critical skill for anyone planning to install a bathroom plumbing system. Knowing how to read and interpret the various diagrams associated with a bathroom plumbing rough-in slab is essential. Fortunately, with some basic knowledge of the various diagrams, the process of installing a bathroom plumbing system can be straightforward. This article will provide an overview of the diagrams associated with a bathroom plumbing rough-in slab, along with helpful installation instructions.
We will start by discussing the plumbing rough in the slab diagram. This diagram is a detailed representation of the entire bathroom plumbing system from the sink to the toilet to the shower. It depicts all of the major components of the system, including the supply and drain lines, the shutoff valves, the plumbing fixtures, and the water heater. By studying the diagram, it is possible to determine the exact placement of the pipes and fixtures, as well as the size of the pipes and the type of materials used in the construction.
Next, we will look at the installation instructions for a bathroom plumbing rough-in slab diagram. This includes the steps necessary to properly install the pipes and fixtures, as well as the techniques used to connect the various components. The instructions also provide advice on how to test the system after installation to ensure that it is functioning properly.
Finally, we will discuss some of the common issues that can arise when installing a bathroom plumbing rough in slab diagram. These include incorrect pipe sizes, incorrect material selection, and incorrect installation techniques. By taking the time to understand the nuances of the plumbing diagrams and the installation instructions, it is possible to avoid these mistakes and ensure a successful installation.
By following these instructions, anyone can easily install a bathroom plumbing rough in slab diagram. With this knowledge, they can ensure that their bathroom plumbing system is properly installed and functioning safely and efficiently.
Troubleshooting Common Problems with a Bathroom Plumbing Rough-In Slab Diagram
Having a functioning bathroom is essential for comfort and safety in any home. Unfortunately, plumbing problems can arise, and troubleshooting them can be difficult without the right tools. A bathroom plumbing rough-in-slab diagram is a great tool to help homeowners identify and solve common plumbing issues without the need for a professional plumber.
These diagrams provide a visual representation of a bathroom’s plumbing system, which makes it easier to identify potential problems. It also makes it easier to locate and repair any plumbing issue quickly and efficiently. A bathroom plumbing rough-in slab diagram will provide an accurate view of the plumbing system and allow homeowners to follow the path of the pipes and determine where the problem is.
The diagram will also provide information about the types of pipes used and the size of the pipes, which is essential for troubleshooting. In addition, it will also provide information about the fittings and valves used in the system. This will allow homeowners to determine which parts are malfunctioning and need to be replaced.
Finally, a bathroom plumbing rough-in slab diagram is a great tool for preventing future plumbing issues. Homeowners can use the diagram to inspect the plumbing system and identify any potential problems before they occur. This can save time and money, and help ensure that the bathroom plumbing system is functioning properly for years to come.
Final Thoughts on Bathroom Plumbing Rough In Slab Diagrams
When it comes to plumbing rough-in slab diagrams for a bathroom, it’s important to take the time to understand the process and the materials involved. Careful planning is essential for a successful bathroom plumbing installation, as errors can be costly and time-consuming to fix. With this in mind, it’s important to have a thorough understanding of the necessary plumbing rough-in slab diagrams before beginning a bathroom installation. With the right preparation, it’s possible to provide a safe and efficient plumbing system that will last for years to come.
Overall, the bathroom plumbing rough-in slab diagrams are an important part of the process that must be done correctly. The diagrams should be studied carefully before beginning the installation process and any questions should be addressed to an experienced plumber. By taking the time to carefully follow the diagrams and understand the materials, it’s possible to create a safe and effective bathroom plumbing system.
FAQs About the Bathroom Plumbing Rough In Slab Diagrams
1. What is a bathroom plumbing rough in slab diagram?
A bathroom plumbing rough-in slab diagram is a diagram that shows the location of all the pipes and fixtures associated with the bathroom plumbing system in a building. It includes the pipes, fixtures, and valves needed for a complete bathroom installation.
2. What is the purpose of a bathroom plumbing rough in slab diagram?
The purpose of a bathroom plumbing rough-in slab diagram is to provide a visual representation of the plumbing system for the bathroom in a building. This diagram is useful for both plumbers and homeowners when designing the plumbing system for the bathroom. It is also useful for troubleshooting any plumbing issues that may arise.
3. What are the key components of a bathroom plumbing rough in slab diagram?
The key components of a bathroom plumbing rough in slab diagram include the water supply lines, drains, vent lines, and fixtures such as the toilet, bathtub, and sink. This diagram also includes the necessary valves and other components needed for the plumbing system.
Conclusion
Bathroom plumbing rough-in slab diagrams provide an important visual representation of the plumbing infrastructure required for a bathroom. These diagrams are an invaluable tool when planning the plumbing layout for a bathroom remodel or new build. They help ensure that all components of the bathroom plumbing system are correctly installed, which is essential for a safe and efficient bathroom. With a proper understanding of how to interpret these diagrams, any homeowner can use them to successfully plan and install their bathroom plumbing system.