Diy Plumbing Smoke Test
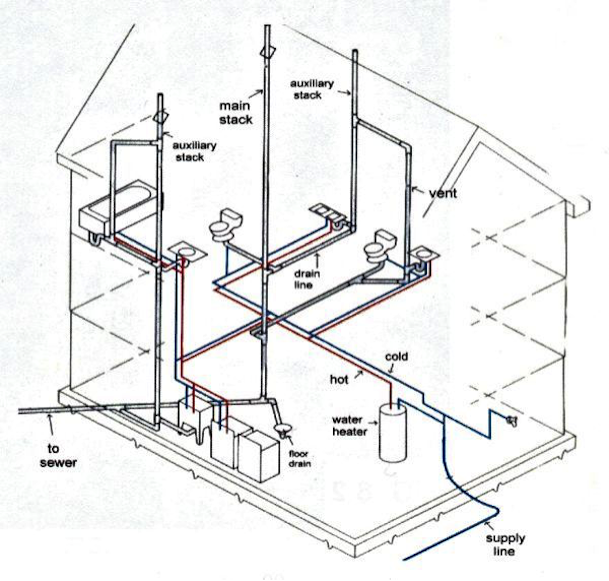
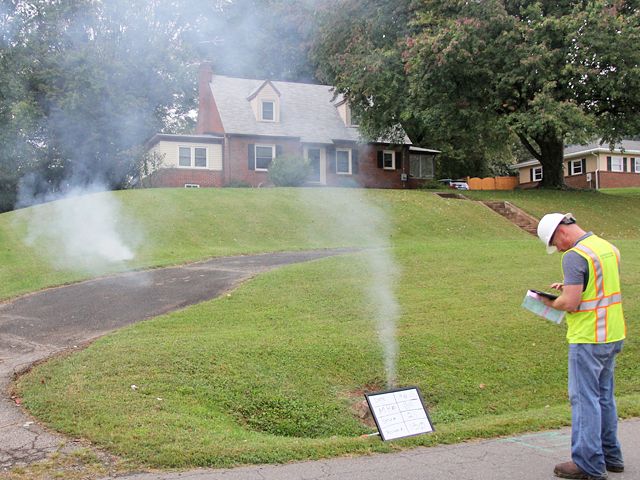
A DIY plumbing smoke test is a great way to quickly and easily detect any air or gas leaks in your home’s plumbing system. This test is a simple, non-invasive process that can be done with minimal tools and supplies. The smoke test works by blowing harmless, non-toxic smoke into the plumbing system, which will then reveal any leaks in the form of smoke exiting the plumbing lines in the form of bubbles or puffs. This test can detect air or gas leaks in residential and commercial plumbing systems to help you identify and repair the problem quickly and easily.
What is a Plumbing Smoke Test?
A plumbing smoke test is a simple, yet effective tool used to identify potential air leaks and plumbing problems in your home. It is a low-cost, non-invasive way to determine whether there are any air leaks in your plumbing system. It is also used to ensure that your plumbing system is functioning correctly.
During a smoke test, a smoke-producing device is connected to your plumbing system. This device emits a harmless, non-toxic smoke that is released into the pipes. If there are any leaks or cracks in the pipes, the smoke will escape and be visible. The presence of smoke indicates that there is a problem that needs to be addressed.
The smoke test is an important part of a comprehensive plumbing maintenance plan. It helps to ensure that your plumbing system is functioning properly and can help you identify potential problems before they become more serious. It is also a great way to detect leaks that may be difficult to locate otherwise.
If you suspect that there is an issue with your plumbing system, contact a professional plumber to perform a smoke test. This simple and cost-effective test can help you identify potential problems and save you money in the long run.
Preparing for a DIY Plumbing Smoke Test
A smoke test is a vital part of any plumbing project. It is testing drain lines, vents, and other plumbing systems for potential blockages, leaks, and other plumbing issues. Performing a smoke test can help to identify issues before they become bigger, more expensive problems. If you want to perform a DIY Plumbing Smoke Test, here are the steps you should take.
First, make sure you have the right materials. You will need smoke tablets, a smoke blower, and a test fan. Additionally, it is important to have a smoke hood, a smoke wand, and a smoke detector. Once you have gathered the necessary supplies, it is time to begin.
Next, install the smoke blower and the test fan. This will ensure that the smoke produced by the smoke tablets will be properly distributed throughout the system. Once this is done, you can place the smoke tablets into the smoke blower and turn it on. The smoke will then be pushed through the system.
Then, it is time to check for blockages. Use the smoke wand to check for areas of smoke accumulation or blockages. If you find any, use the smoke hood and smoke detector to locate and identify the source of the blockage.
Finally, once the smoke test is complete, you should take the necessary corrective measures. This could involve replacing pipes, tightening joints, or using specialized tools to clear blockages. By following these steps, you can ensure that your plumbing system is working properly and efficiently.
By taking the time to perform a DIY Plumbing Smoke Test, you can save yourself time, money, and hassle in the long run. Be sure to take all necessary precautions, and make sure your smoke test is done correctly.
Conducting a DIY Plumbing Smoke Test
Plumbing systems are an integral part of any home and require regular maintenance to ensure they remain in good working order. An important part of this maintenance is a smoke test. This test helps detect any leaks or blockages in a home’s plumbing system. While hiring a professional to conduct a smoke test is an option, many homeowners choose to do a DIY smoke test.
Conducting a DIY plumbing smoke test is relatively simple and can be done with a few common tools. First, the homeowner needs to identify the area of the home’s plumbing system that needs to be tested. Then, the homeowner needs to gather the necessary materials, such as a smoke machine, smoke pellets, and a vacuum pump. Once the materials are gathered, the homeowner needs to install the smoke machine and smoke pellets into the plumbing system.
Once the smoke machine is installed, the homeowner can turn it on and the smoke will begin to fill the plumbing system. As the smoke moves through the system, any leaks or blockages will become visible. The homeowner can then identify the location of any leaks or blockages and take the necessary steps to repair them.
By conducting a DIY plumbing smoke test, homeowners can easily and quickly identify any issues in their plumbing system and take the appropriate steps to repair them. Doing so can save homeowners time and money, as they will not have to hire a professional to conduct the test. However, it is important to remember that a smoke test should always be conducted in a safe and controlled environment.
Troubleshooting Common Issues When Performing a Smoke Test
When it comes to plumbing, smoke testing is a great way to detect potential issues. A smoke test is a process where smoke is forced through the plumbing system to identify leaks and other problems. It can also be used to detect plumbing code violations. However, troubleshooting common issues when performing a smoke test can be tricky.
First, it’s essential to create a proper seal so that the smoke does not escape. If the seal isn’t tight, the smoke will escape and the test won’t be effective. Additionally, it’s important to check for any obstructions that could be blocking the flow of smoke. This could include pipe vents, open windows, or even the system itself.
It’s also important to have the right tools and materials for the job. You’ll need a smoke machine, a smoke detector, and a vacuum pump. Additionally, you should have a camera or other recording device so that you can document the results of the smoke test.
Finally, it’s important to know the local plumbing codes and regulations. This will help ensure that you are performing the test safely and legally. Additionally, it’s important to understand the results of the smoke test and take appropriate action if any issues are found.
In summary, smoke testing is a great way to detect potential plumbing problems. However, it’s important to troubleshoot common issues when performing a smoke test to ensure that the test is effective and that the results are accurate. By following the steps outlined above and being aware of local codes and regulations, you can ensure that your smoke test is successful.
Common Causes of Failed Smoke Tests
Diy plumbing smoke tests are a great way to identify potential problems with your home’s plumbing system. However, there are various reasons why a smoke test can fail. It’s important to understand the common causes of failed smoke tests so you can take the necessary steps to fix the problem.
One of the most common reasons for failed smoke tests is poor ventilation. If your home is not properly ventilated, the smoke may not be able to disperse properly and the test may fail. Another potential issue is a clogged drain or vent. Make sure all of your drains and vents are clear before doing a smoke test.
Another cause of failed smoke tests is poor sealing. If your pipes are not properly sealed, smoke may be able to escape through any gaps or cracks in the seal. It’s important to check that all of your connections are properly sealed before running a smoke test.
Finally, another potential cause of failed smoke tests is a broken pipe. If one of your pipes is cracked or broken, smoke may be able to escape through the break, resulting in a failed test. Inspect all of your pipes for signs of damage before conducting a smoke test.
By understanding the common causes of failed smoke tests, you can take the necessary steps to ensure that your smoke test will be successful. With the right preparation and knowledge, you can confidently identify any potential problems with your home’s plumbing system.
Safety Considerations When Performing a DIY Plumbing Smoke Test
When it comes to home maintenance, DIY projects can be a great way to save money and learn a new skill. DIY plumbing projects are no exception. One of the most important of these projects is the plumbing smoke test. Smoke testing is a great way to test your home’s plumbing system for air or gas leaks. If you’re thinking of performing a DIY plumbing smoke test, it’s important to understand the safety considerations.
First, be sure to wear proper safety gear when conducting the smoke test. This includes eye protection, gloves, and a face mask. Make sure your room is well-ventilated and the smoke is properly vented to the outside. Prepare the area by turning off the gas and electricity and opening the windows.
It’s also important to understand the risks associated with the smoke test. These include the possible release of carbon monoxide, which is a deadly gas, and the inhalation of potentially harmful particulates. To reduce the risk of injury or illness, be sure to follow all safety precautions and to use a smoke machine that meets safety standards.
Additionally, it’s important to perform the smoke test promptly. If the smoke test is left unfinished, it can result in long-term damage to your plumbing system. To avoid this, be sure to complete the test in one session.
When done properly, a DIY plumbing smoke test can be a safe and effective way to test your home’s plumbing system. By understanding the safety considerations and following all safety precautions, you can complete the smoke test with confidence.
FAQs About the Diy Plumbing Smoke Test
Q: What is a DIY plumbing smoke test?
A: A DIY plumbing smoke test is a method of testing for air leaks in the plumbing system of a home. It involves using a smoke machine to introduce non-toxic smoke into the plumbing and then checking for leaks in the system.
Q: What materials do I need for a DIY plumbing smoke test?
A: To perform a DIY plumbing smoke test, you will need a smoke machine, a smoke detector, and safety equipment such as gloves, safety glasses, and a fire extinguisher.
Q: How often should I perform a DIY plumbing smoke test?
A: It is recommended to perform a DIY plumbing smoke test at least once a year to make sure the plumbing system is functioning properly and that there are no air leaks.
Conclusion
The DIY plumbing smoke test is an effective and inexpensive way to detect air leaks and drafts in a home’s plumbing system. It is simple to perform and requires minimal tools, making it an ideal choice for homeowners who want to save money on energy costs. The smoke test will identify any leaks and drafts in the system, which can then be addressed and repaired to save money on heating and cooling costs. Overall, the DIY plumbing smoke test is an easy and cost-effective way to improve the efficiency and comfort of a home.