How To Plumb A Freestanding Tub Drain?
Installing a freestanding tub drain can be a daunting task. Whether you’re a DIYer or a professional plumber, understanding the basics of plumbing a freestanding tub drain is essential in order to complete the job correctly. Here’s a step-by-step guide to help you understand the process. First, you’ll need to remove the existing drain and ensure that the new drain is a perfect fit. Next, you’ll need to measure the drain and cut the pipe to length. Once you’ve done this, you’ll need to connect the drain to the drain pipe using the appropriate fittings. Finally, you’ll need to install the drain in the tub and secure it with the necessary clips and fasteners. With this guide, you’ll be able to successfully install a freestanding tub drain in no time!
Gather Necessary Materials and Tools
Installing a freestanding tub drain is a project many homeowners can accomplish with the right tools and materials. To get started, first determine what type of drain your tub requires and make sure you have all the necessary materials and tools before you begin. Gather the following items: a drain kit, plumber’s putty, a hacksaw, a ratchet, and a basin wrench.
Next, measure the drainpipe and the tailpiece to make sure they fit together properly. The tailpiece should be cut to fit and should extend 1-1/2 inches below the drainpipe. Use the hacksaw to make any necessary cuts.
Once you have the tailpiece cut to the right size, apply some plumber’s putty to the underside of the tailpiece and then insert it into the drainpipe. Secure the tailpiece in place with the basin wrench and the ratchet. Check for any leaks and make sure everything is secure.
Finally, make sure the drain is properly connected to the drainpipe. Use the basin wrench to secure the drain to the tailpiece. When everything is secure, you can add the drain cover and the overflow cover, and you can enjoy your new freestanding tub drain.
Remove Existing Drain Assembly
Removing the existing drain assembly from a freestanding tub can be a tricky task, but with the right tools and a few simple steps, it can be done quickly and easily. Before starting the process, be sure to turn off the water and power supply to the tub, and follow safety protocols while working. First, locate the drain assembly and identify the nuts and bolts that secure it to the tub. Once these are removed, the drain assembly should be ready to lift off the tub. If it doesn’t come off easily, use a rubber mallet to gently tap the drain assembly until it’s loose. Make sure to save the drain assembly and any pieces that were attached to it so they can be re-attached to the new drain assembly.
Prepare and Install Tub Drain
Installing a freestanding tub drain can be a daunting task for the DIYer. However, with the right tools and knowledge, you can easily plumb a freestanding tub drain in no time. Before you get started, it’s important to make sure you have all the necessary supplies, such as a drain kit, PVC pipe, and fittings. Once you have the materials, it’s time to prepare the area and install the drain.
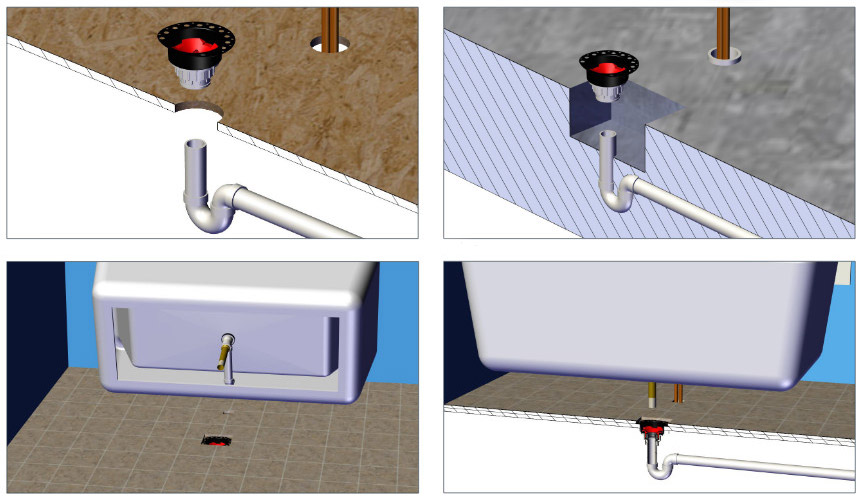
The first step is to measure and mark the drain opening. Then, cut the drain opening with a jigsaw. After the drain opening is cut, install the drain kit components in the opening. Connect the drain parts with PVC piping, and secure them with plumber’s putty. Next, slide the drain into the opening, and attach the drain flange using the included bolts. Once the drain is installed, attach the PVC piping to the overflow valve. Finally, test the drain to make sure it is functioning correctly.
With a few simple steps, you can easily plumb a freestanding tub drain. Make sure to have the necessary supplies and take your time while working to ensure a successful installation. By following these steps, you can ensure your freestanding tub drain is properly installed and functioning properly.
Connect Drain to Waste Line
When plumbing a freestanding tub drain, one of the most important steps is to connect the drain to the waste line. This will ensure that water is properly drained away from the tub. It is important to use the correct materials and techniques when connecting the drain to the waste line.
First, measure the diameter of the tub drain and the waste line. This will help determine the appropriate size of the connector. Then, use a hacksaw to cut the waste line to the appropriate length. Next, attach the connector to the drain and the waste line. The connector should be inserted into the drain and the waste line, then secured with screws.
Once the connector is in place, use a putty knife to apply a bead of plumber’s putty around the drain. This will help create a watertight seal and prevent any leaking. Finally, attach the drain stopper to the drain and attach the drain tube to the waste line. This will ensure that the water drains properly from the tub.
Taking the time to properly connect the drain to the waste line will help ensure that your freestanding tub is properly plumbed and functioning correctly. By following these simple steps, you can successfully plumb a freestanding tub drain.
Test and Adjust the Drain Assembly
Installing a freestanding tub can be a somewhat daunting task. The drain assembly requires precision and attention to detail to ensure a good seal and proper operation. Testing and adjusting the drain assembly is the final step of the installation process and the most important for long-term reliability.
To test the drain assembly, turn on the water and check for any leaks or drips. If any are found, tighten the fittings or replace the rubber gaskets. Make sure the drain stopper is working properly and that the tub is filling up without any issues. To adjust the drain assembly, you’ll need to adjust the drain pipe and the overflow pipe. Make sure the drain pipe is properly aligned and that the overflow pipe is not blocked. Once these adjustments are made, the assembly should be tested again to make sure everything is functioning properly.
It’s important to take the time to properly test and adjust the drain assembly when installing a freestanding tub. Doing so will ensure the assembly functions correctly for years to come and that the installation is safe and reliable. Following these simple steps will make your freestanding tub installation a smooth and successful one.
Finishing Touches and Clean Up
Once the drain installation is complete, the final touches and clean up can be done. The first step is to test the connection for any leaks, and make sure everything is tightened securely. Once this step is complete, the area can be cleaned up and the overflow cover can be installed. This cover will help keep water from overflowing the tub. Finally, the drain cover can be installed. This cover will help keep dirt and debris from entering the drain, and will also give the bathtub a more finished look. After the clean up is complete, the freestanding tub is ready to be filled and enjoyed.
FAQs About the How To Plumb A Freestanding Tub Drain?
1. What tools do I need to plumb a freestanding tub drain?
A: You will need a few basic tools to plumb a freestanding tub drain, such as a wrench, pliers, a hacksaw, and a drain assembly kit.
2. How do I install the drain in my freestanding tub?
A: You will need to attach the drain assembly to the drain opening in the tub with a wrench and secure the nuts with pliers. Then you will need to cut the drain pipe to the correct length and attach it to the drain assembly with the provided screws.
3. What type of sealant should I use when connecting the drain pipes?
A: You should use a high-quality plumber’s putty or silicone sealant to ensure a watertight connection.
Conclusion
Plumbing a freestanding tub drain is a relatively simple process that can be done with the right tools and a bit of knowledge. With the right parts and a few steps, you can easily have a functioning freestanding tub drain in no time. Make sure to read all instructions carefully and follow all safety precautions to ensure the best results. With the right tools and a steady hand, you can get your freestanding tub drain plumbed in no time.