Rear Outlet Toilet Plumbing Diagram
A rear outlet toilet plumbing diagram is a visual representation of how a rear outlet toilet should be installed. Rear outlet toilets are a type of toilet that has waste pipes located at the back of the toilet instead of the front. This type of toilet is often used in commercial or industrial settings. The diagram will show the proper placement of the pipes, valves, and other components needed for the installation of the toilet. It will also provide instructions on how to connect these components correctly so that the toilet will function properly.
Overview of Rear Outlet Toilet Plumbing
Toilets have become increasingly popular for their efficient water-saving capabilities and space-saving design. While these toilets may look similar to traditional front outlet toilets, they have a distinct plumbing configuration that requires careful attention to ensure the system is properly installed. To help you better understand the rear outlet toilet plumbing diagram, here we provide an overview of the components and how they work together.
First, a trap arm connects the toilet’s outlet to the drain line. This is usually made of ABS or PVC piping, and should be sloped at a minimum of 1/4 inch per foot. Next, a p-trap connects the toilet’s outlet to the drain line. This curved piece of piping prevents sewer gases from entering the room and helps keep the system airtight. The p-trap also helps keep the toilet bowl from overflowing. Finally, the drain line carries wastewater from the toilet to the main sewer line. This is usually made of ABS, PVC, or cast iron piping, and should be installed according to local codes.
By following these installation guidelines, you can ensure your rear outlet toilet plumbing is safe and efficient. With proper maintenance and care, you can enjoy the many benefits of this efficient design for years to come.
Understanding the Structure of a Toilet Plumbing Diagram
Installing a rear outlet toilet may seem daunting, but with the right plumbing diagram, it can be a manageable job. A toilet plumbing diagram helps you understand the structure and components of the toilet, allowing you to plan your installation effectively.
A toilet plumbing diagram typically consists of four main parts – the waste pipe, the vent pipe, the water supply, and the toilet. The waste pipe is used to connect the toilet to the main sewer line, and it is usually made of PVC or ABS. The vent pipe is used to ensure that the air pressure in the system is maintained and prevents the toilet from becoming blocked. The water supply is the source of water for the toilet and is connected to the main water supply line. Finally, the toilet itself is made of porcelain and is connected to the waste pipe, the vent pipe, and the water supply.
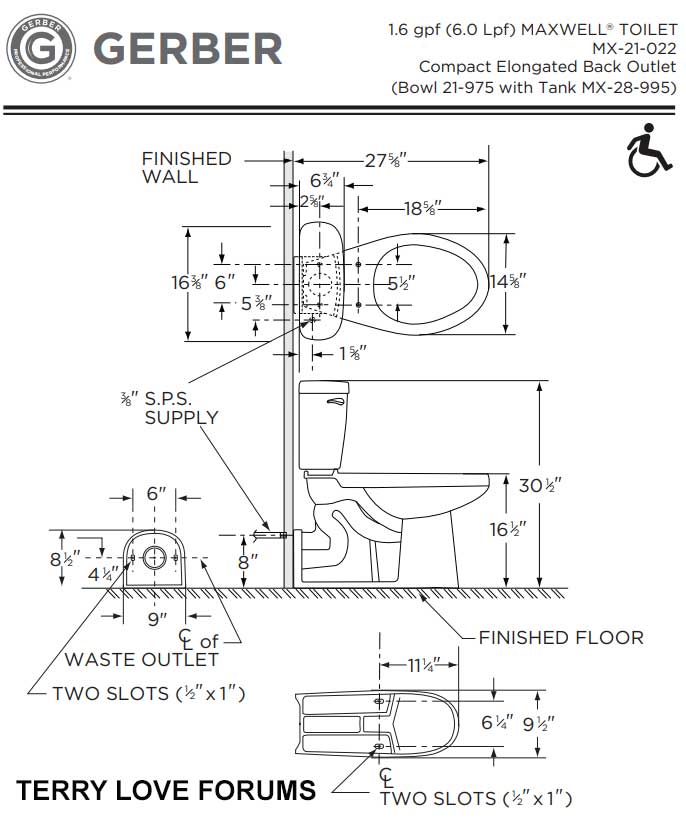
A rear outlet toilet plumbing diagram also includes important details such as the location of the toilet, the size of the pipes, and the types of fittings that are needed. It is also important to note that the diagram should include all safety measures that should be taken when installing the toilet.
By understanding the structure and components of a rear outlet toilet, you can ensure that your installation is completed safely and correctly. With the help of a rear outlet toilet plumbing diagram, you can be sure that you have all the necessary information to plan and complete your installation.
Identifying Key Components in a Toilet Plumbing Diagram
When it comes to bathroom remodeling, knowing how to read plumbing diagrams is essential. In this article, we will take a look at the components of a rear outlet toilet plumbing diagram and discuss what each part does. With a better understanding of the diagram, you’ll have an easier time tackling any plumbing issues that arise during your remodel.
First, let’s take a look at the main components of the diagram. The tank is the part of the toilet that holds water. The bowl is the part of the toilet you sit on. The flush valve is the part of the toilet that opens and closes to control the water flow. The outlet pipe is the pipe that connects the tank to the bowl. The overflow pipe is the pipe that prevents the tank from overflowing. Finally, the vent pipe is the pipe that allows air to flow in and out of the tank.
Now that we’ve identified the parts of the rear outlet toilet plumbing diagram, let’s discuss how each component works together. The tank is connected to the bowl via the outlet pipe, which allows water to flow from the tank to the bowl. The flush valve is connected to the tank and it lets water pass through when you press the flush button. The overflow pipe is connected to the tank and it prevents the tank from overflowing. Finally, the vent pipe is connected to the tank and it allows air to enter and exit the tank.
Understanding the components of a rear outlet toilet plumbing diagram is a key part of successful bathroom remodeling. By knowing the parts of the diagram and how they work together, you can easily identify any plumbing issues that arise during your project.
Exploring Different Types of Toilet Plumbing Diagrams
Having a rear outlet toilet in your home can provide many advantages, but understanding the plumbing diagram that goes along with it can be a bit tricky. While there is no one-size-fits-all solution for this type of plumbing system, there are a few main types that you should be aware of. By understanding the different types of rear outlet toilet plumbing diagrams, you can make sure your toilet is properly installed and functioning correctly.
The most common type of rear outlet toilet plumbing diagram is the ‘traditional’ setup. This type of diagram includes the main toilet bowl, a waste pipe, and a vent pipe. This type of diagram is the simplest to understand and is the most common type of plumbing diagram found in homes.
Another type of rear outlet toilet plumbing diagram is the ‘tankless’ setup. This type of diagram does not include a tank and instead relies on a single pipe for both the inlet and outlet of the toilet. This type of setup is often used in commercial buildings, as it is more efficient and takes up less space.
The ‘three-pipe’ setup is another type of diagram for R.O. toilets. This type of diagram includes a waste pipe, a vent pipe, and a third pipe that connects the toilet to the waste line. This type of plumbing diagram is more complicated than the traditional setup and may require additional plumbing work.
Finally, the ‘sewer line’ setup is the most complex type of rear outlet toilet plumbing diagram. This type of diagram includes a waste pipe, a vent pipe, and a third pipe that runs from the toilet to the sewer line. This type of plumbing diagram is often used in areas where the sewer line is not easily accessible.
By understanding the different types of rear outlet toilet plumbing diagrams, you can ensure your toilet is properly installed and functioning correctly. With the right guidance, you can make sure your toilet is set up correctly and operating safely.
Benefits of a Toilet Plumbing System
The rear outlet toilet plumbing diagram illustrates the advantages of a rear-outlet toilet system. By installing a rear-outlet toilet, you gain several benefits, such as improved drainage, increased flushing efficiency, and better water conservation. This system allows for a larger, more efficient water trap and a larger waste line. It also eliminates the need for a separate vent stack and reduces the potential for clogs. Additionally, the rear-outlet design allows for a low-profile toilet and provides more room behind the toilet for storage. All of these benefits make rear-outlet plumbing an attractive choice for any bathroom.
Installing a toilet plumbing system is not without its challenges, however. The installation process requires extra planning and forethought to ensure proper placement of the waste line and the water trap. Additionally, because the outlet is located on the rear of the toilet, the plumbing layout needs to be taken into consideration when selecting a toilet.
Overall, toilet plumbing systems offer several unique benefits that make them an attractive choice for any bathroom remodel. With proper planning and installation, you can enjoy the improved drainage, increased flushing efficiency, and improved water conservation that come with this system.
Common Issues with Toilet Plumbing Diagrams
Rear outlet toilets, also known as floor-mount or wall-mount toilets, are a unique type of toilet that requires specialized plumbing diagrams to ensure proper installation. While the diagrams for rear outlet toilets may look complex, understanding the basics can help you diagnose common issues and make repairs. In this article, we’ll take a look at the components of a rear outlet toilet plumbing diagram, common issues that can arise, and tips for troubleshooting and resolving them.
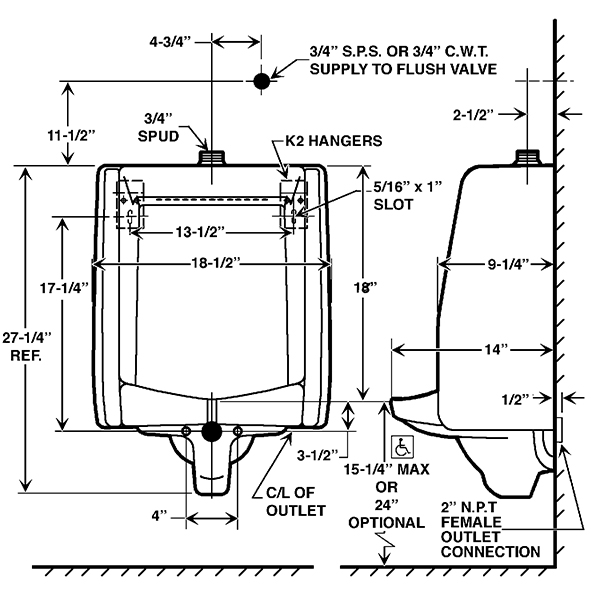
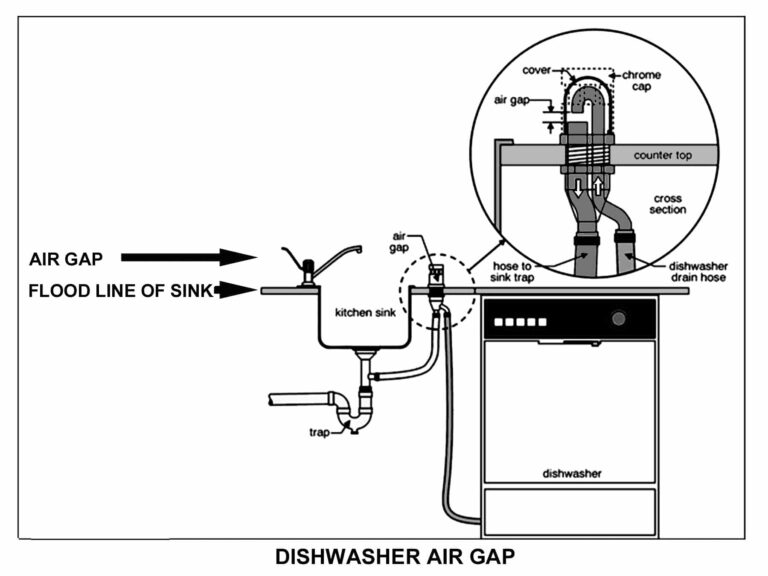
First, let’s take a look at what makes up a rear outlet toilet plumbing diagram. The diagram typically consists of a line that connects the supply line to the toilet, a vent pipe that runs from the toilet to the vent stack, and a wax seal or gasket between the toilet and the outlet drain flange. The diagram should also indicate the correct direction for the pipes and fittings when installing the toilet.
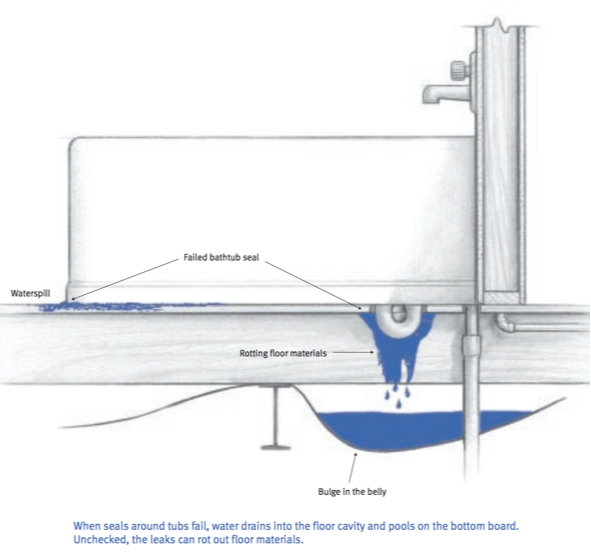
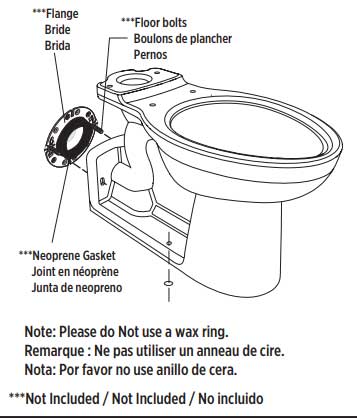
Now that we’ve reviewed the components of a rear outlet toilet plumbing diagram, let’s look at some common issues that can arise. One of the most common issues is a leak in the wax seal or gasket. This can be caused by improper installation or an old or damaged wax seal. Additionally, the supply line may be blocked or the vent pipe may be clogged, preventing the toilet from draining properly.
Finally, let’s discuss some tips for troubleshooting and resolving issues. If you suspect a leak in the wax seal, remove the toilet and inspect the seal for any damage or cracking. If the seal is damaged, replace it with a new one. Additionally, make sure the supply line and vent pipe are free of any debris, and check the connections for any leaks.
By understanding the components of a rear outlet toilet plumbing diagram and common issues that can arise, you’ll be better equipped to diagnose and repair any issues you may encounter. With the tips in this article, you’ll be able to ensure your rear outlet toilet is installed and operating correctly.
FAQs
Q: What is a rear outlet toilet?
A: A rear outlet toilet is a type of toilet that has a drainpipe located in the back or rear of the toilet, rather than at the base as with traditional toilets.
Q: How is a rear outlet toilet installed?
A: Rear outlet toilets are installed by connecting the drainpipe to the toilet’s rear outlet and then connecting the drainpipe to the home’s main drain line.
Q: What type of plumbing diagram is needed for a rear outlet toilet?
A: A plumbing diagram is necessary when installing a rear outlet toilet. The diagram should include information such as the location of the main drain line, the size and type of pipes needed, and the type of fittings required.
Conclusion
The toilet plumbing diagram provides a useful guide for installing a rear outlet toilet in a home. It outlines all the steps and components needed to make the installation successful and can help prevent any potential issues with the plumbing. With careful attention to detail and following the instructions provided, anyone can install a rear outlet toilet with confidence.