Solar Pool Heater Plumbing Diagram
A solar pool heater plumbing diagram is a visual guide that illustrates the plumbing system used to harness solar energy to heat an outdoor swimming pool. It provides a step-by-step guide on how to install the necessary piping, pumps, and collectors needed to transfer the heat from the solar panels to the pool. It is an invaluable tool for anyone interested in installing a solar pool heater and can help ensure a successful and efficient installation.
Overview of Solar Pool Heater Plumbing Diagrams
Solar pool heating is becoming increasingly popular due to its cost-effectiveness and eco-friendly advantages. To get the most out of your solar pool heating system, it’s important to understand how the plumbing works. Solar pool heater plumbing diagrams provide a comprehensive overview of the system and can help you make the most of your pool’s solar heating capacity.
Solar pool heater plumbing diagrams include the pool pump, filter, and other components of the pool’s plumbing system. They also provide details on the size and type of pipes used, as well as the fittings and valves needed to connect them all. In addition, solar pool heater plumbing diagrams also outline the flow of water from the pool to the solar collector and back. This is important to ensure the optimal performance of the system.
Solar pool heater plumbing diagrams can also help you troubleshoot any problems that may arise with your system. They can help you pinpoint where the issue is located and provide you with the necessary information to make repairs. Additionally, they can help you determine if there are any potential safety hazards associated with the plumbing system and provide recommendations on how to address them.
Solar pool heater plumbing diagrams are a helpful resource for any pool owner looking to make the most of their solar heating system. By understanding the plumbing system, you’ll have greater peace of mind knowing that your pool is operating safely and efficiently.
Benefits of Using a Solar Pool Heater
Using a solar pool heater is a great way to save money on energy costs while keeping your pool at a comfortable temperature. Not only is it environmentally friendly and cost-effective, but it also has several other benefits that make it an attractive option for pool owners. For starters, the installation process is relatively easy and hassle-free, as it only requires connecting a few pipes to the existing plumbing system. With the help of a solar pool heater plumbing diagram, you can easily install the system and enjoy the benefits it brings.
In addition to saving money on energy, solar pool heaters are also very efficient, and they require little maintenance. They can also help you extend your swimming season, as the pool will remain warm even during the cooler months. Furthermore, you won’t have to worry about noisy pumps or vents, as solar pool heaters are virtually silent. Finally, they are long-lasting, and you won’t have to replace them for many years.
Overall, using a solar pool heater is a great way to keep your pool warm while saving energy and reducing your carbon footprint. With its easy installation and lack of maintenance, it is a great option for any pool owner looking to reduce their energy costs and provide a more comfortable environment for swimming.
Types of Solar Pool Heaters
When considering the best way to heat your pool, one of the options you may be looking into is a solar pool heater. Solar pool heaters use the sun’s energy to heat your pool to just the right temperature. While there are a variety of solar pool heaters available, it’s important to understand the different types and the advantages and disadvantages associated with each.
One type of solar pool heater is a direct system, which involves a pump that circulates the pool water through a filter and into the solar collectors. The collectors absorb the sun’s energy, which is then transferred to the water, and the water is then returned to the pool at a higher temperature. Direct systems are usually more efficient than indirect systems, but they are also more expensive to install.
Another type of solar pool heater is an indirect system. This type of system uses a heat exchanger to collect the sun’s energy and transfer it to the pool water. The heat exchanger is usually installed in the pool equipment pad and connected to the solar collectors via a series of pipes. Indirect systems are usually more cost-effective than direct systems, but they also tend to be less efficient.
Regardless of which type of solar pool heater you choose, it’s important to understand the plumbing diagrams associated with each type. This will help ensure the heater is installed correctly and that your pool is heated properly.

Components of a Solar Pool Heater Plumbing Diagram
Solar pool heaters are an increasingly popular way to extend the swimming season and keep pool water warm. While the installation can seem intimidating, understanding the components of a solar pool heater plumbing diagram can help make the process a breeze.
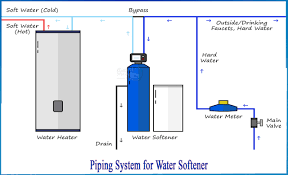
The plumbing diagram should include the main pool pump, check valve, solar collector, and filter. The pump draws water from the pool, and the check valve prevents the water from flowing back into the pool. The water then flows to the solar collector, where it is heated by the sun. After the water has been heated, it is pumped back into the pool via the filter.
The plumbing diagram should also include the necessary valves and piping required for the system to function. Valves are used to control the flow of water to and from the pool, while piping is used to transport the water from one component to another.
Finally, it is important to note that the plumbing diagram should include a bypass system. This allows the pool to be heated without the use of the solar collector, allowing for a more energy-efficient setup.
Understanding the components of a solar pool heater plumbing diagram is key to a successful installation. With a bit of knowledge and preparation, your solar pool heater can be up and running in no time.
Step-by-Step Guide to Installing a Solar Pool Heater Plumbing Diagram
Installing a solar pool heater can be a great way to extend your swimming season and reduce energy costs. For those who are looking to install their solar pool heater, a plumbing diagram is an essential tool. This step-by-step guide will outline the process of constructing a solar pool heater plumbing diagram, from start to finish.
First, it is important to understand the different types of solar pool heaters and how they work. A standard solar pool heater consists of a series of pipes and valves, which are connected to your pool’s existing plumbing system. The pipes and valves are designed to channel the heated water from the solar collector to the pool. Depending on the type of solar pool heater you have, you may also need to install additional piping and valves.
Once you have a clear understanding of the type of solar pool heater you have, it is time to start constructing the plumbing diagram. Begin by sketching out the layout of the piping and valves on a piece of paper. Make sure to label each component clearly so that you can easily refer back to it during the installation process. Once you have your diagram drawn out, you can begin to connect each component to your pool’s existing plumbing system.
When connecting the components, it is important to make sure they are properly sealed. You can use a combination of heat shrink tubing and plumber’s tape to ensure a tight seal. Once you have all the components connected, you can turn on the pump and check for any leaks. If you find any, turn the pump off and seal the area with additional plumber’s tape or heat shrink tubing.
By following these steps, you should be able to create a reliable and efficient solar pool heater plumbing diagram. With your diagram in place, you will be able to enjoy the benefits of a solar pool heater for years to come.
Troubleshooting Common Issues with Solar Pool Heater Plumbing Diagrams
Solar pool heaters offer a great way to extend the swimming season and enjoy balmy temperatures in the pool all year round. But, like all pool equipment, solar pool heaters require regular maintenance and troubleshooting. One of the most important things to understand when troubleshooting a solar pool heater is the plumbing diagram. With the right tools and knowledge, you can quickly identify common issues and find cost-effective solutions.
The plumbing diagram for a solar pool heater is a map of the components and pipes that make up the system. It’s important to familiarize yourself with these diagrams so you can quickly identify potential problems and fix them before they become bigger issues. Common plumbing issues that you may encounter include pipe blockages, broken valves, and loose fittings. It’s also important to check the pressure and temperature readings to make sure they are within the manufacturer’s specifications.
In addition to troubleshooting plumbing issues, understanding a solar pool heater’s plumbing diagram can help you with installation and maintenance. Knowing where the pipes and components are located can make it easier to replace old or worn-out parts as well as adjust settings for optimal performance.
By taking the time to understand the plumbing diagram of your solar pool heater, you can save yourself time and money by troubleshooting and resolving issues quickly and efficiently. Investing in the right tools to help you read and interpret the plumbing diagram is essential for successful troubleshooting and maintenance.
FAQs About the Solar Pool Heater Plumbing Diagram
1. How do I know which size solar pool heater plumbing diagram to use?
Answer: The size of the solar pool heater plumbing diagram you need depends on the size of your pool, the size of the solar collectors, and the total flow rate of water through the system.
2. Do I need to hire a professional to install a solar pool heater plumbing diagram?
Answer: It is recommended to hire a professional to install a solar pool heater plumbing diagram as they will have the necessary knowledge and tools to ensure it is installed safely and correctly.
3. How often should I check the solar pool heater plumbing diagram for leaks or other issues?
Answer: The solar pool heater plumbing diagram should be inspected at least once a year for any leaks or other issues. It is also recommended to inspect the plumbing diagram after any major weather changes or storms.
Conclusion
The solar pool heater plumbing diagram provides a helpful guide for those interested in installing a solar pool heater. By following this diagram, the user can ensure that the piping and components of the pool heater are correctly installed and set up. This diagram is also helpful for troubleshooting any issues that may arise when operating the solar pool heater. With a solar pool heater, users can enjoy a warm and comfortable pool all year round.